How to succeed when installing remedial wall ties.
There are many reasons why it may be necessary to carry out remedial wall tie installation. The most common reason is wall tie corrosion, where the original wall ties were inadequately protected against rusting. Poor galvanising and the use of bitumen paints was dealt with in the early eighties and these days, wall ties are stainless steel.
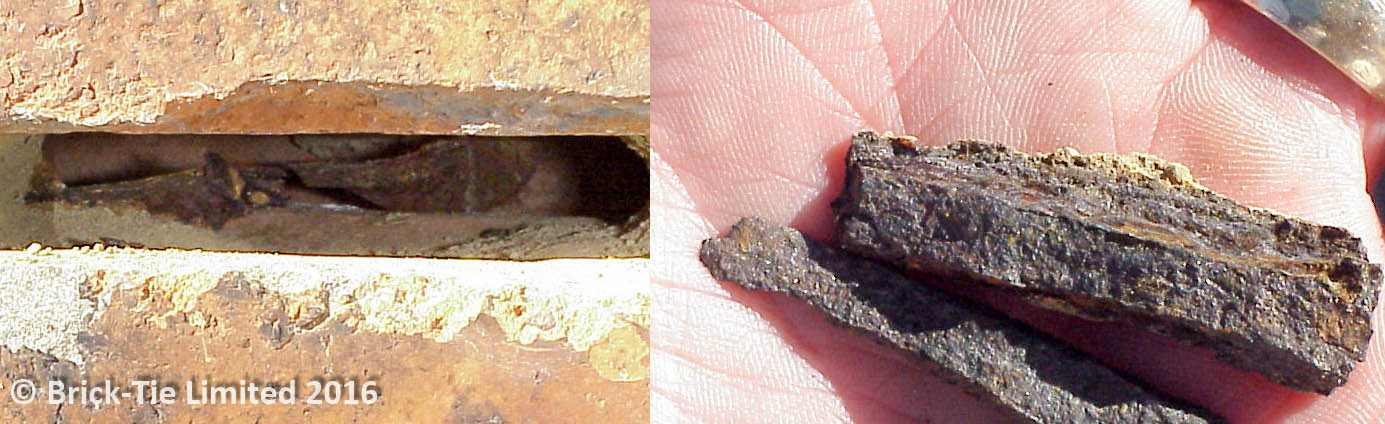
In the bed-joint the wall ties looks rusty – when wrestled out with a chisel, the true extent of corrosion is revealed
Other reasons for remedial work include incorrect installation during construction; missing ties or ties which are too short to provide sufficient embedment in one or both leaves of a cavity wall.
So, what can go wrong when remedial wall ties are installed or wall tie replacement undertaken? First things first – which remedial wall tie should be used?
Which cavity wall tie?
A good place to look at the different kinds of remedial wall ties and their advantages and disadvantages is the Building Research Establishment Digest number 329 (2000). This is available vid the BRE shop. It has a useful explanation of the basic types such as:
- Mechanical expansive ties – these work by being inserted into a pre-drilled hole and then expanded to secure them in one or each leaf (combinations are available, which offer mechanical expansion on one end and perhaps a resin fix at the other)
- Resin bonded Ties – a wide range of Helical and stud/bar based stainless steel rods, which can be inserted into clean pilot holes already filled with resin on the inner leaf and injected in the outer leaf after insertion
- Friction fix, or Screw-in type remedial wall ties
- Grouted sock anchors, where a fluid cementitious grout is injected, either through the hollow rod of the tie or via a dedicated feed tube – the grout being retained in an expanding sock whilst in its fluid form and then curing to a rigid mechanical/adhesive fix.
- Specialised remedial ties for use where one leaf of a wall is missing or bricks are removed to expose the remote leaf (sometimes called starter ties). These may be mechanical, shot fired (steel only), Screw-in (timber frame) or resin bonded.
Which of the above type are needed will depend mainly on the construction of the walls. Mechanical ties need to be installed in sound, strong materials; brickwork, reasonably dense blocks or concrete. In softer materials mechanical ties may offer reduced performance due to the increased stresses they apply. In these cases a non-expansive remedial tie, such as a resin bond item, friction fix or grouted sock type will offer greater reliability.
For hollow units a specialist should be employed to help choose and possibly proof test the proposed tie system. It is important not to simply choose a remedial system on cost or availability. Getting the right tie is crucial.
A second attempt and this mechanical type remedial tie has failed (soft inner leaf material)
.
A word of caution – Cavity Wall Insulation.
Where cavities are filled before remedial wall tie work is done, special care is needed. Simply drilling holes through the insulation will cause some compression and contamination of the fill. BRE 329 (2000) offers advice on reducing this. Failure to take existing CWI into account will leave the installer liable for any damage arising from dampness or mould. Penetrating damp and cold bridging could arise through shoddy remedial wall tie installation.
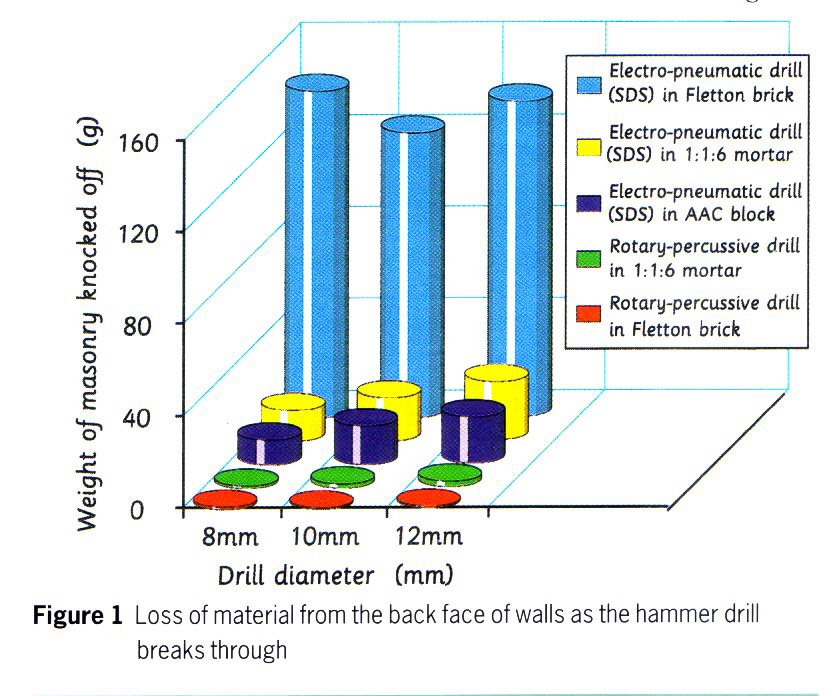
BRE 329 (2000), gives vital information, comparing cavity contamination in relation to drill bit size and drilling machine type.
Installation of remedial ties can be fraught with problems and there are well documented cases where remedial work has been defective. Here’s a checklist to help the installation go well:
- Make sure that the ties have been chosen with a good methodology – not just picked out of the air.
- Make sure the proposed installation method agrees with the data sheets from the manufacturer. That all of the required fitting tools, tension testers, resins and torque wrenches are on site and calibrated where required. Agree the performance criteria first – do you need 1Kn or more?
- The right drill bit diameter and length. Rotary hammer or percussion?
- The installation density is dictated by many factors – make sure this is agreed in writing.
- The work is not complicated, but once installed there will be little opportunity to check that the system works – so build-in a testing and inspection routine. Ideally choose a contractor who is approved via recognised consumer schemes and trade bodies (Trustmark, Chas, PCA, The Wall Tie Installers Federation, Which? Trusted Traders etc).
- For guidance a RANDOM 5% test of the remedial ties is about right, for a one-off domestic property. Where multi-storey and large projects are involved this may be reduced over time, depending on the success of the testing early on (it may also increase if defects are found).
- Record the tension test results as work proceeds
- A guarantee should be asked for. Insurance is available to cover remedial wall tie work for up to ten years (GPI or similar).
What can go wrong at wall tie installation stage?

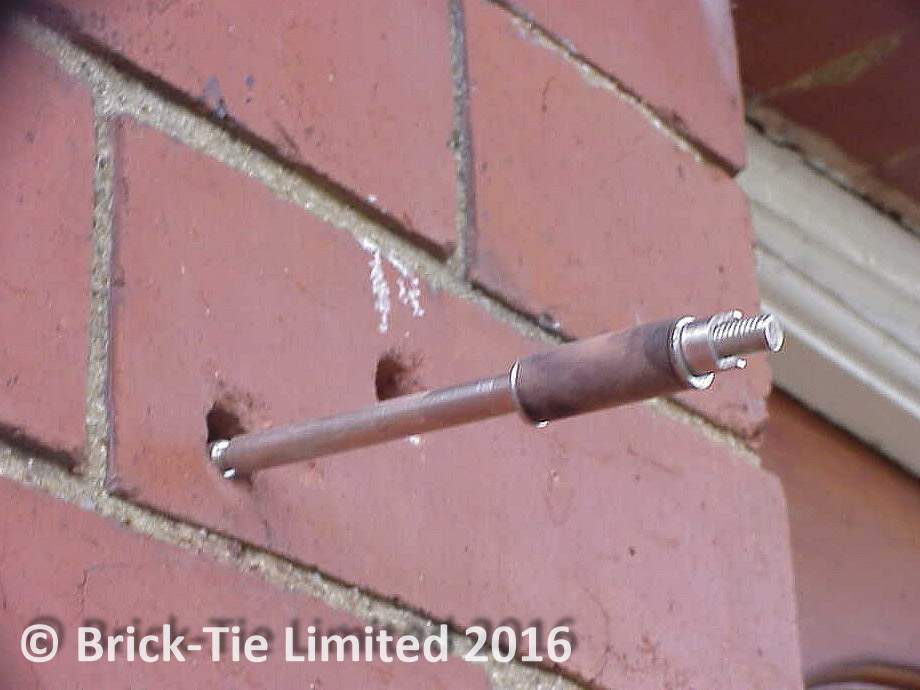
This tension test rig gauge demonstrates that a ‘pull’ of 1KN is being resisted by the remedial wall tie.
Tension tests are not reaching the agreed performance level.
If for example the ties are achieving 800N rather than 1000N?
All agreed proof tests should already include a ‘factor of safety’. Is the actual level still within this? If so then it may still be sufficient. However, in these cases the proportion of tests should be increased to make sure that the 5% at 800N are not the best of the ties. The factor of safety includes allowance for reduced performance. If you are now testing at the minimum – at least 20% should be checked. This could be reduced over time as the work proceeds, provided all ties are reaching the revised minimum.
What else could be done? It may be possible to improve the performance, without reaching for another type of tie. Check the installation procedure; the right diameter holes? Correct depth? Are the holes clean before the tie is placed? Is the inner hidden leaf a consistent material or does it vary? What about resins and grouts? Are they in date and being mixed and injected correctly? Has the width of the cavity varied, so that the embedment has been reduced – perhaps a longer tie of the same type will improve matters?
If refining the installation does not produce a significant improvement there are now two possibilities:
- Change the tie specification to another
- Increase the installation density to account for the reduced performance.
The new replacement tie will depend on the mode of failure. Increasing installation density should be done with the agreement of a structural engineer. The Engineer will supply the density increase via calculation. This is important because if the installation density is increased too much, this can lead to adverse unintended consequences. For example too many ties may introduce excess rigidity across the cavity in a vertical and tangential direction, which could cause cracking. If the density is not sufficient the system may not provide enough support for the external cladding – an engineer will know this. Is it wise for example, to increase density, when there is cavity wall insulation present? Of course it isn’t.
If the tests show a very high failure rate then abandon the remedial system and go back to the beginning. This is very rare in cases where a good methodology has been followed at the start. However, if remedial wall ties are just chosen because ‘They were in stock’, my mate said they’re the best or, ‘They were the cheapest’ it is quite likely to happen.
The Law.
All construction work is now subject to The Construction (Design and Management) Regulations 2015. Yes, even small domestic jobs on your street. The contractor should always provide the client with a health and safety file on completion of the work. This must include the type and number of wall ties installed. Anyone who may interact with the work in the future can take account of the presence of the tie system via this file. For example if a house fire has occurred, this could weaken a resin bonded tie system, which should then be checked. Carrying out further alteration to the property may also disturb a remedial system, particularly if parts of a wall are demolished.
Wall ties involves work at height – always work safe.
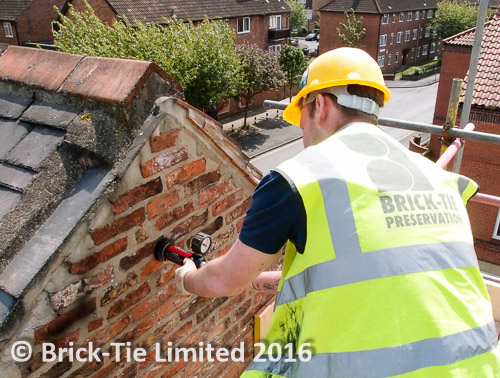
Every remedial wall tie installation involves work at height. This is a hazard to the wall tie technicians and potentially, those who are at ground level. Health and safety is everyone’s business. However, it is also a useful barometer when deciding how diligent a contractor may or may not be on site. Good preparation and care for health and safety is a legal requirement, with stiff penalties for non-compliance. Even so, poor safety and health care is common on construction sites, especially domestic and residential projects. Bearing this is mind it is fairly sound for clients to deduce, that a contractor who cuts corners with health and safety anyway, despite the risk, will pay even loss attention to work, which he can hide and which may not be found wanting, until long after he’s left site.
I hope the above basic advice will help small builders, homeowners and developers make sure their remedial wall tie installation projects are a success.
Bryan.
Here are some useful links to other posts on wall tie installation and wall tie corrosion too. You may also like to visit my own wall ties company pages, particularly if your project is in Yorkshire. If you have any questions about wall tie corrosion, do please drop me a line and I’ll do my best to help you. For a very detailed analysis of the common parts and physiology of wall ties try this post.